
CHYIHAUR's website lets a customer see the finished sign before paying. The customer uploads an SVG logo, the system turns it into glowing 3D letters inside the browser, and the letters are mounted on the facades of four demo buildings. The customer can also upload a photo of a storefront and align the sign on the actual entrance. The showroom and the city on the home page are both React Three Fiber WebGL scenes, and the logo and the photo stay in the customer's browser.
The full process for 3D loading and memory is in Web 3D performance engineering, and this article carries only one section of it. The overall build scope is described under 3D interactive website development.
Showroom: Turning SVG into 3D Letters with Glow Materials
The showroom has four demo buildings, each with a model file under 140 KB. Each building has its own sign position, rotation, and scale settings, and one building has two more sign positions, on the side and on the top, in addition to the central sign; each position can take a different logo. An uploaded SVG is first checked with DOMParser, and only a file whose root node is svg and that contains at least one shape node goes into the scene.
The conversion parses paths with the three.js SVGLoader and extrudes each shape into a 3D letter with ExtrudeGeometry, dividing curves into 6 segments. Coordinates are normalized so that the longest side is 10 units and centered, so a logo of any aspect ratio enters the scene at the same size, and the size and thickness sliders take over from there. A multicolor logo keeps the fill color of each path in the file by default, and it can be switched to a single custom color. The color picker offers 14 common sign colors, a color code field, and the system color picker.
Glow comes from the self-illumination of the material. Filled faces use MeshStandardMaterial with emissive set to the same color as the fill, emissiveIntensity controls the brightness, and the painted style sets emissive to 0. In photo simulation the default metalness is 0.3 and the default roughness is 0.4. The image then goes through a Bloom post-process, with a brightness threshold of 1.0 in photo simulation and 1.22 on the demo buildings, and only pixels brighter than the threshold produce a halo.
The edge trim places one box along every segment of the SVG path and merges the boxes into a single draw call with InstancedMesh; the styles are no trim, raised, and flush. For back glow in photo simulation, the logo outline is first drawn into a texture, and a custom blur shader (16 directions, 4 sampling rings) paints that texture onto a plane behind the letters, where additive blending layers the spilled light. The demo buildings put an extruded copy of the letters behind the originals instead, also with additive blending.
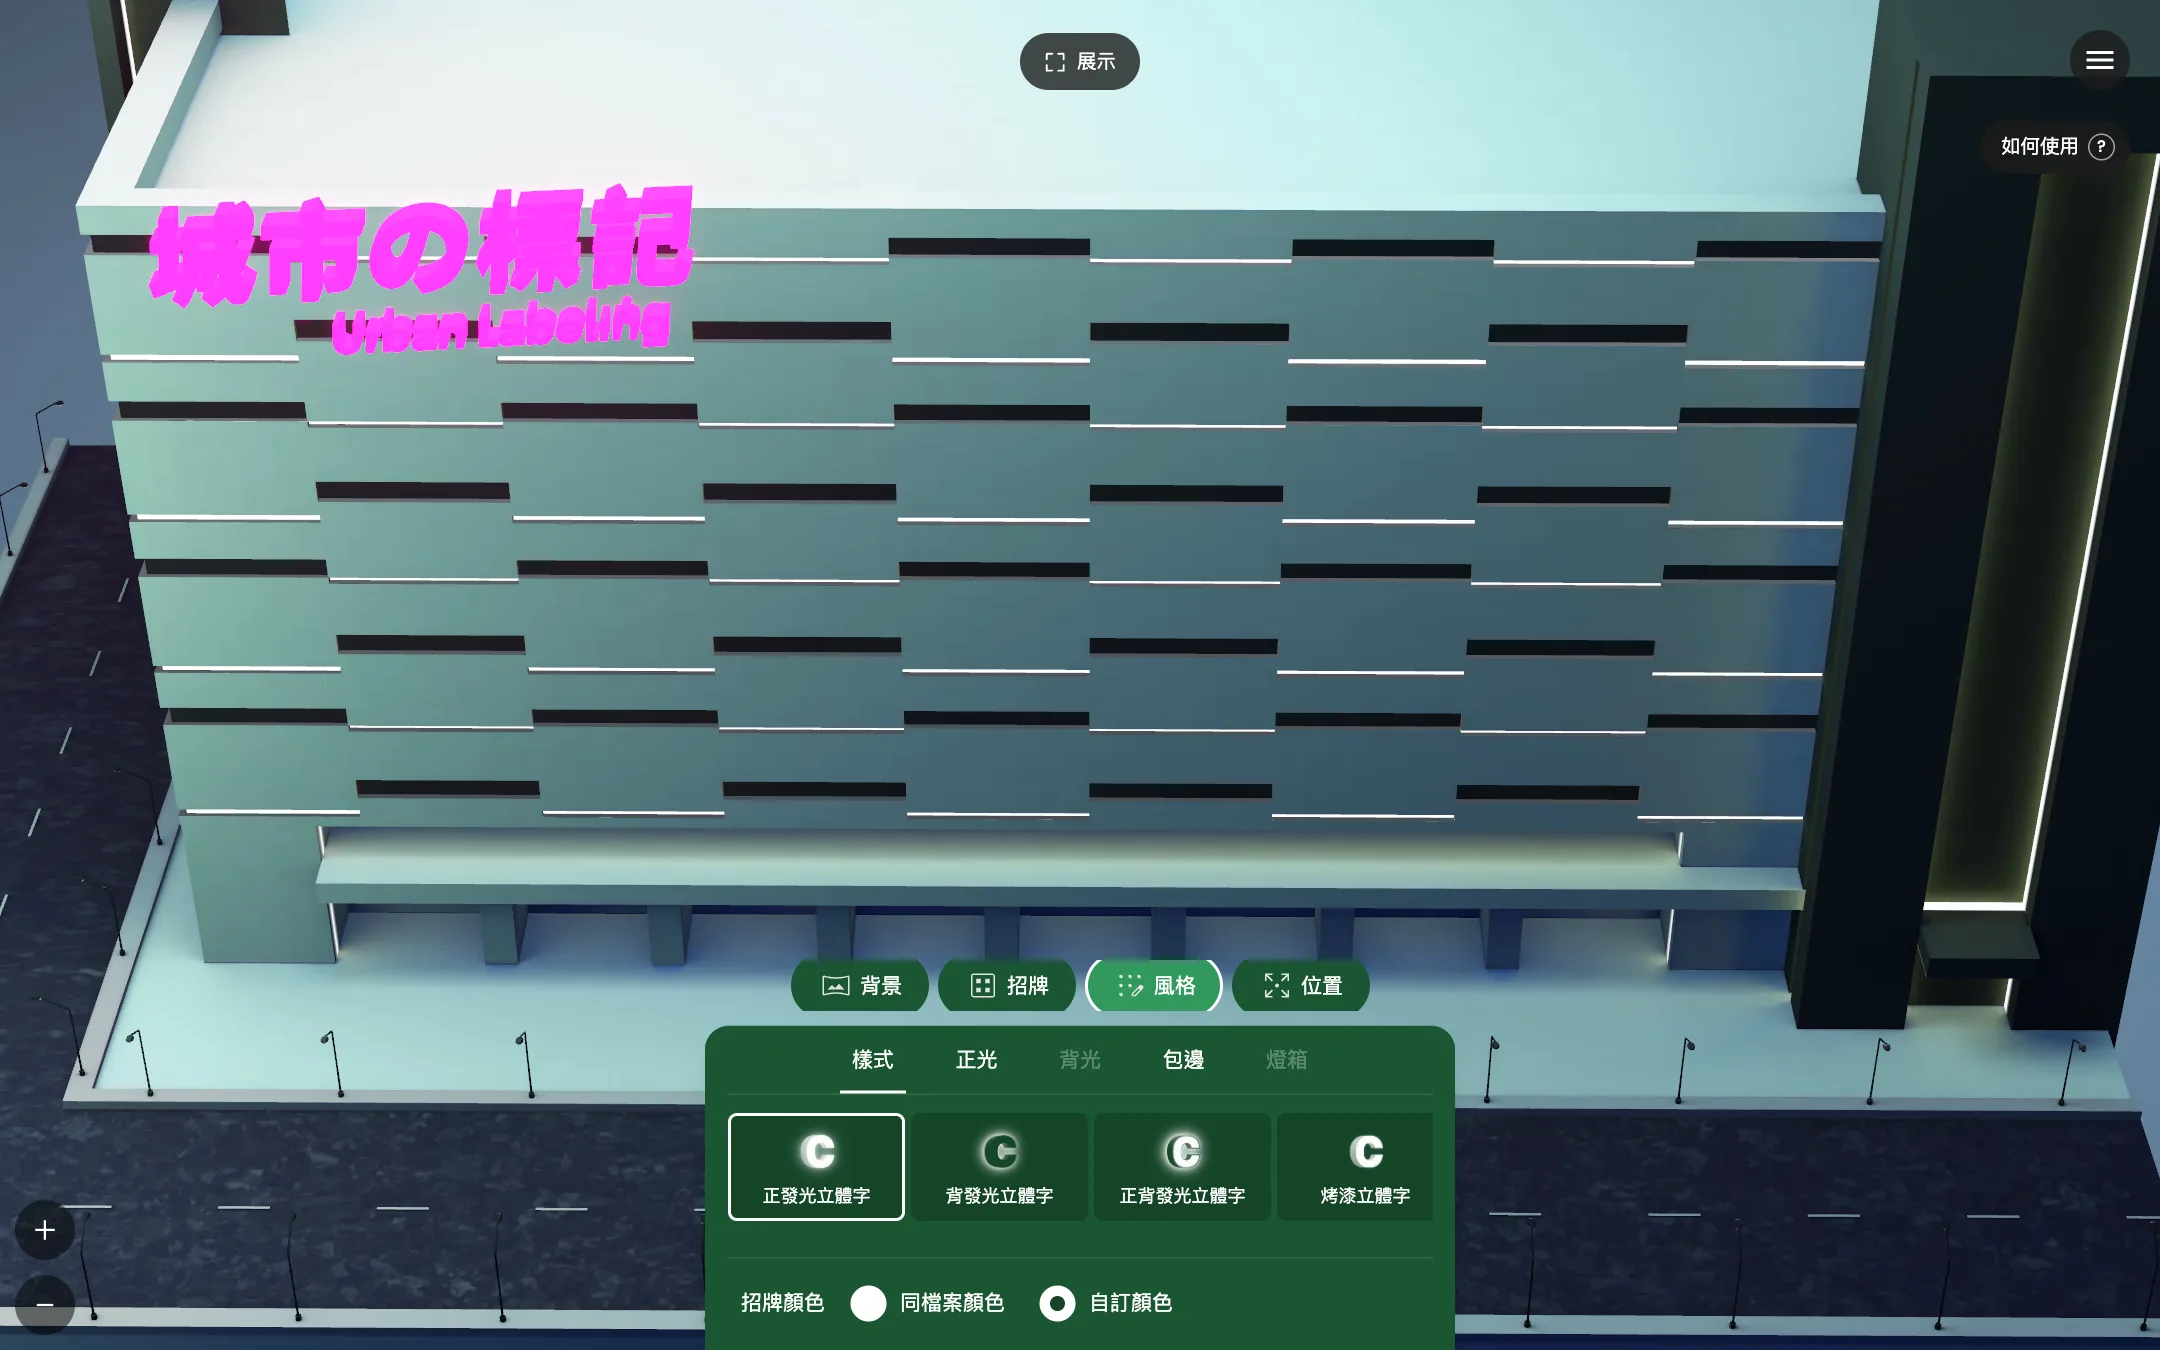
There are five styles: front glow, back glow, front-and-back glow, painted 3D letters, and advertising light box. One click on the panel switches the style, and the light box style is used on two of the demo buildings.
Letting customers do the work themselves has research behind it. The abstract of Franke et al., 2010 reports a significantly higher willingness to pay for products customers design themselves, independent of preference fit and design effort, with a sense of accomplishment mediating the effect. The study covers mass customization products and does not address signage, so only the direction is taken from it here.
The same screen works for proposals. Pressing Present collapses the bottom menu and the top navigation bar and hides both with visibility, so keyboard Tab does not stop on controls that cannot be seen. The camera on a demo building then swings left and right along a sine curve, with an amplitude of 72 or 45 degrees depending on the building and a period of about 52 seconds. When the system is set to reduce motion, the camera does not swing automatically.

On the first visit to the showroom, a seven-step guide appears after about 2.6 seconds, and each step comes with a screen showing the actual operation. Esc closes the guide, the left and right arrow keys turn the pages, and focus stays inside the dialog; the How to use button in the upper right brings it back at any time. The upload window has the same focus management, and when it closes, focus returns to the button that opened it.
Photo Simulation: Aligning the Sign to the Customer's Storefront
Photo simulation treats the storefront photo as a background plane that fills the window, and the sign is a 3D object placed in front of it; both are composited in the same WebGL scene. The background plane fills the window with cover scaling based on the aspect ratio of the photo, uses a material that lighting does not affect, and has its render order fixed at the very bottom. The sign responds to scene lighting and Bloom, gets a white outline from an Outline post-process when the pointer passes over it, and shows draggable control axes after a click.
Nine built-in storefront scenes cover both day and night, and each carries a preset position, size, and rotation; photos taken at an angle also carry vertical and horizontal tilt angles. When the background changes, the photo fades out in 0.35 seconds and fades in over 0.45 seconds, and the preset values of the scene apply at the moment the fade-out ends and the new photo goes in. The position range is a quarter of the window width and height, and a sign that goes beyond it is pulled back automatically. During a drag, position and rotation update once per movement, and the rotation sliders cover plus or minus 90 degrees on each of the vertical, horizontal, and depth axes.
When a photo is uploaded, the browser reads the file with URL.createObjectURL, shrinks it on a canvas to a longest side of 2000 px, and outputs it as JPEG at quality 0.85 for use as the texture source; the upload window accepts JPEG and PNG. A 4000 x 3000 photo straight from a phone becomes 2000 x 1500, and the decompressed texture drops from about 48 MB to about 12 MB (width, height, and 4 bytes per pixel multiplied together, mipmaps not counted). The photo is processed only in the browser and is never sent to a server.
User's browser
- Read the SVG and photosFileReader, canvas downscaling
- Convert to 3D letters and compositeWebGL scene with Bloom post-processing
Development team's server
- Static filesBuilding models, KTX2 textures, decoders, environment light textures
Never sentThe SVG logo and the storefront photo uploaded by the customer
Data flow of the showroom and photo simulation on the CHYIHAUR website.
The same operations work on a phone. The control panel has a maximum height of 260 px and scrolls inside the panel when the content is longer, with the system safe area kept at the bottom edge. The canvas height uses svh units, a single finger pans, and two fingers pinch to zoom.
3D City Home Page: Loading Order and Camera Control
The home page is a 3D city that can be dragged and zoomed, with six hotspots linking to the consultation, cases, about, services, showroom, and ESG pages. The whole 3D scene is deferred with next/dynamic and server-side rendering is turned off, so three.js, drei, and the city model stay out of the initial load of the first screen, and hydration and first paint of the text content below are unaffected.

The camera controller is custom-written and replaces the CameraControls built into drei. Zoom moves along the line of sight, with the distance limited to between 10 and 30 units and panning limited to plus or minus 12 units, and input is smoothed exponentially so that it does not depend on the frame rate. The mouse wheel zooms only while Ctrl or Command is held, and ordinary scrolling is left to the page. The canvas is set to touch-action: pan-y, so on a phone a vertical swipe still scrolls the page, and only horizontal drags and two-finger pinches go to the 3D scene. Hotspot labels appear only when the camera distance is within 25 units.
The entry sequence runs in this order:
- Preload first finishes compiling the materials in the scene and uploads the textures to the GPU.
- gl.compileAsync compiles all shaders in the background, and the scene is marked ready only after that, with a wait of 3 seconds at most.
- Once the scene is ready, the blur pass in EffectComposer goes from blurred to sharp in 1.2 seconds, and the whole pass is unmounted at the end, so no full-screen post-process stays resident.
- When the blur ends, the navigation bar and tagline fade in, and the camera moves closer along the line of sight over 1.5 seconds.
The WebGL recommendations from MDN also list compiling all shaders before linking as a practice, and KHR_parallel_shader_compile can be used to avoid blocking. The render dpr is capped at 1.5. Once the first screen scrolls out of the window, an IntersectionObserver switches frameloop to never, and the city stops drawing.
Textures and Geometry: KTX2, Draco, and Self-Hosted Decoders
The city scene has 34 meshes and 25 looping animations. The geometry is compressed with Draco, and the GLB file is about 2.7 MB; the Khronos Draco extension specification defines how this compression is written in glTF. All meshes share nine MeshBasicMaterial instances with no real-time lighting, and the materials are disposed one by one when the visitor leaves the home page.
The textures were originally eight 4K images; the scene now uses 2K versions encoded as KTX2 (ETC1S), which keeps the textures in a compressed format in GPU memory. The estimate falls from about 681 MB to about 30 MB. The KHR_texture_basisu specification explains that for textures in a KTX2 container with Basis Universal supercompression, the engine has to transcode such textures into a block-compressed format that the platform supports. The specification describes only the transcoding mechanism and gives no savings figure, so the 30 MB is an estimate for this scene.
The Draco and Basis decoders, along with the six sets of environment light textures used by the showroom, are all hosted on the development team's own servers. If an environment preset has no matching local file, no environment texture is mounted, and the page does not reach out to a third-party URL. The before-and-after comparison and how it is calculated are in 3D model optimization before and after, and how much a phone can hold is in memory budgets for 3D on phones.
What Happens When Loading Fails
Before the 3D scene is mounted, the page probes WebGL by trying webgl2 and then webgl and confirming that the context is not in a lost state. If neither is available, the page switches directly to a static cover and shows the navigation bar. The probe runs only after mounting, and the first render is always treated as available, which matches the server output and avoids a hydration mismatch. An exception thrown while the scene renders is caught by an error boundary, and the page falls back to the static cover in the same way. The cover consists of the brand logo, a one-line statement, and a note, and content below the first screen is unaffected.
The loading progress layer of the showroom shows a percentage with useProgress from drei. When all resources are already in the cache, the layer closes automatically after a grace period of about 1.5 seconds; when loading fails, it closes immediately, and a separate cap of 20 seconds applies. When the visitor leaves the showroom, the GLB and textures specific to that scene are released from the cache, and the shared environment light textures are kept for the next showroom.
- Enter the home pageAfter mounting, probe webgl2 and webgl and confirm the context is not lost
- Load the city sceneTexture upload and shader precompilation, 3 seconds at most
- Scene readyInterface enters, and the city can be dragged and zoomed
- WebGL unavailable, or an exception thrown during renderingShow the static cover and the navigation barContent below the first screen loads as usual
Loading flow of the 3D city on the CHYIHAUR home page.
From Preview to Consultation: Sales Proposals and the Form
The showroom can be reached from the home page. A customer swaps in a logo, aligns it to the storefront, and sees the finished sign before making an inquiry, and a salesperson can open the same screen in a meeting to explain a proposal.
Usage path on the CHYIHAUR website.
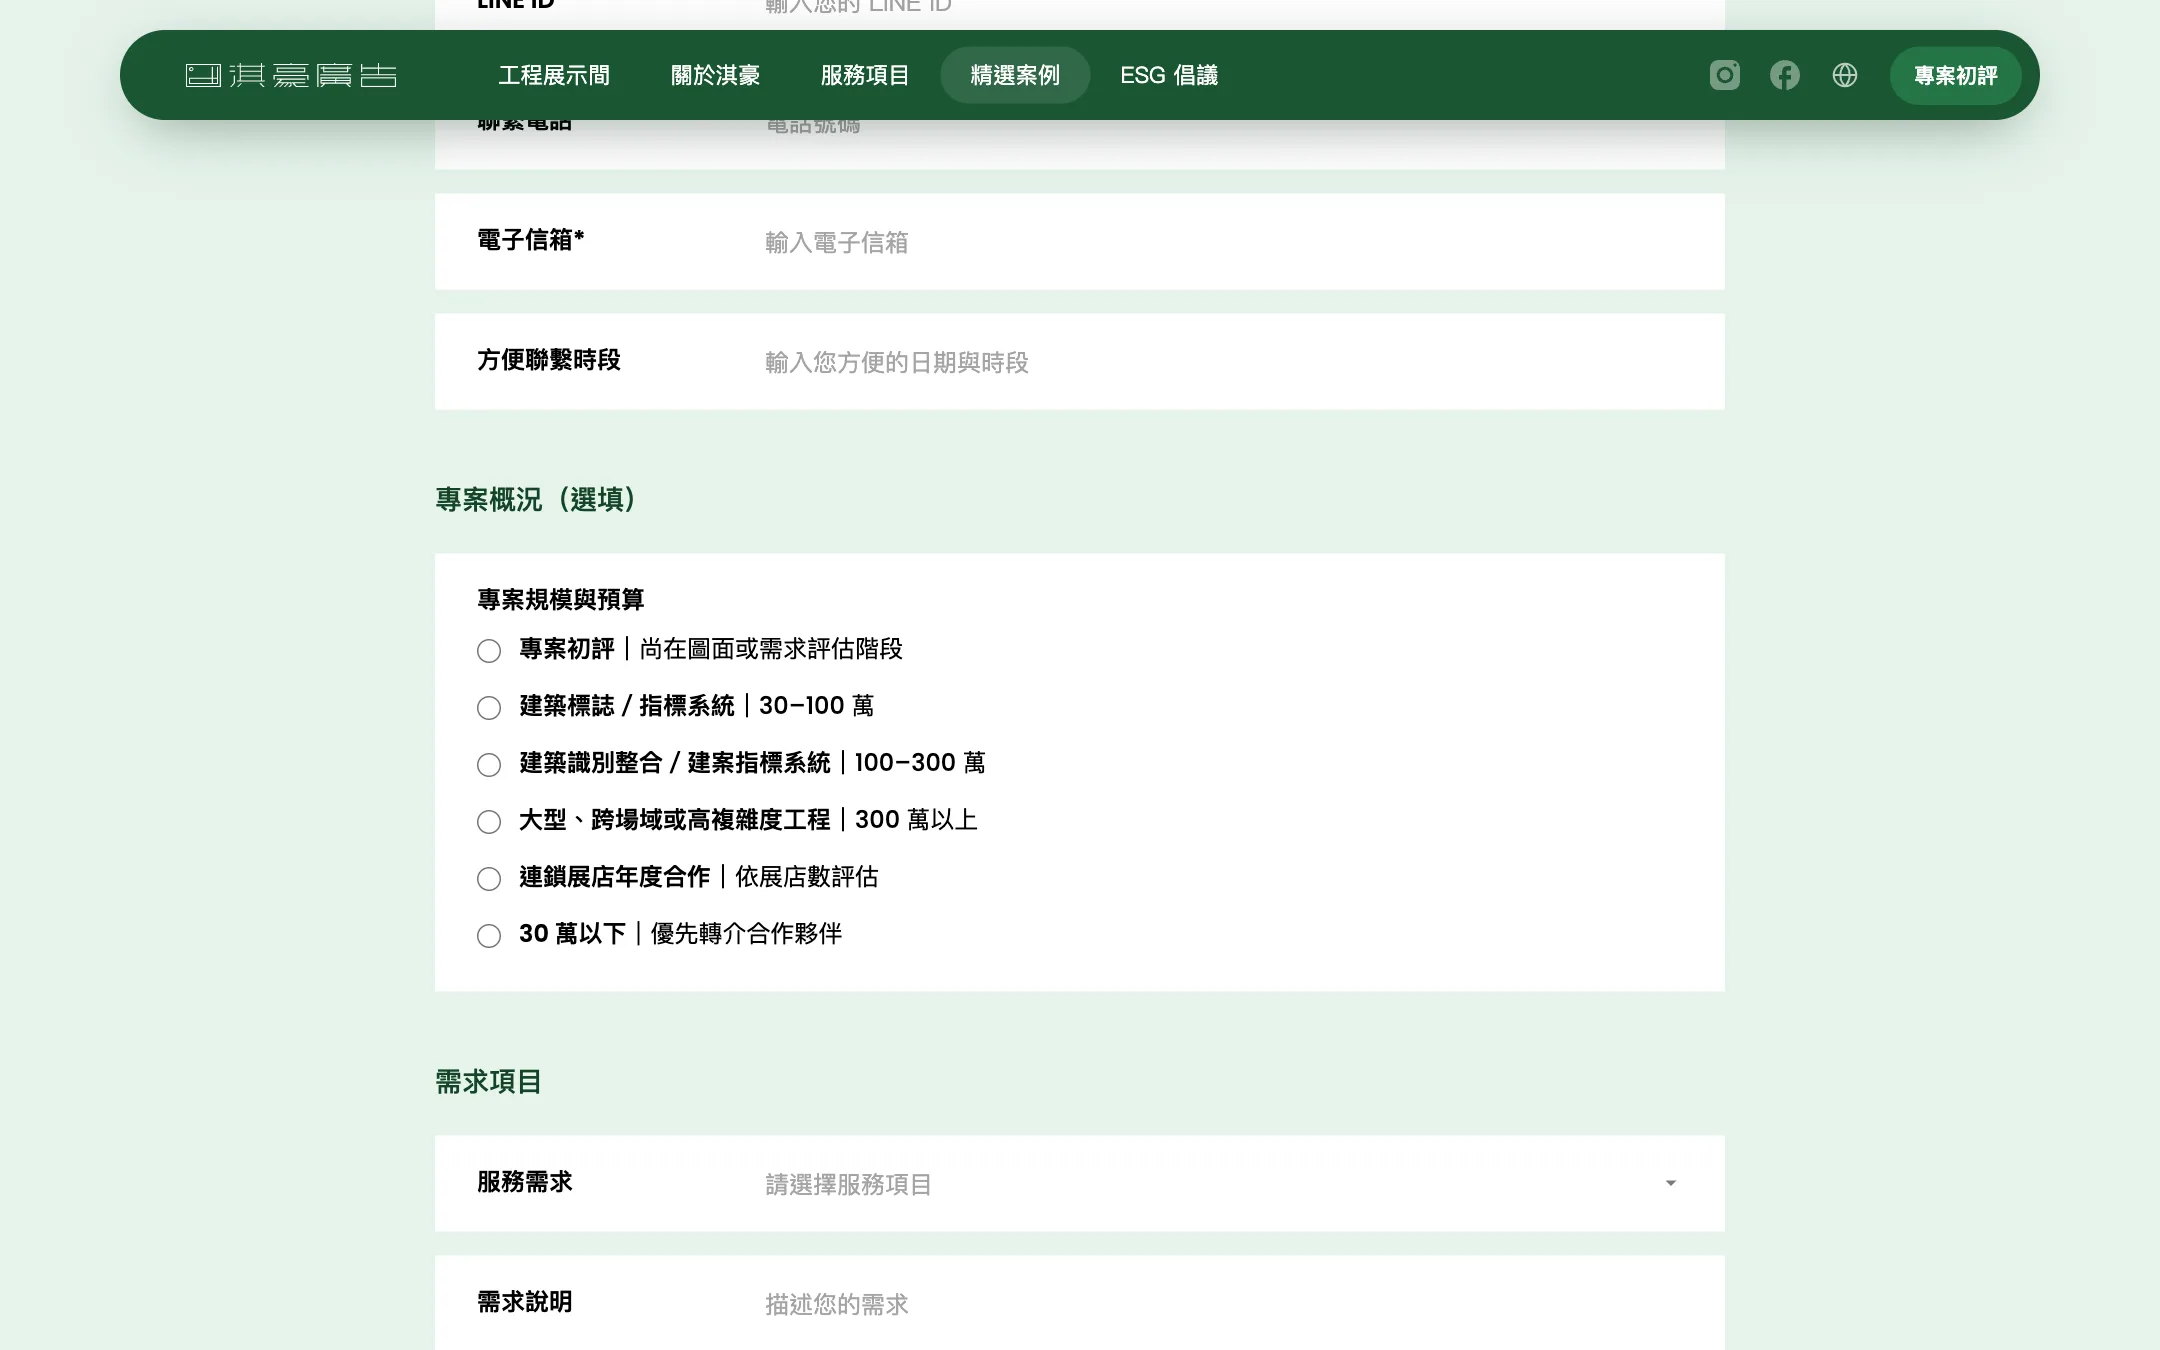
Every case page ends with an embedded inquiry form that first asks for the items needed and a budget range.
The website currently comes in Traditional Chinese, English, Japanese, and Malay. The showroom content lives inside a canvas, so the page also carries an H1 and descriptive paragraphs that only crawlers and screen readers read, and it outputs CollectionPage and BreadcrumbList structured data. Case pages output FAQ structured data and llms.txt. Google's JavaScript SEO documentation explains that content visible after rendering is what gets indexed, that rendering runs when resources allow, and that not every bot executes JavaScript, so it recommends server-side rendering or pre-rendering. The full approach is in search and AI crawler readability for 3D websites.
Product Types This Fits
The same approach fits industries where the finished product is visible to the customer only after it is made: signage, building materials, doors, windows and curtain walls, interior renovation, exhibition booths, and lighting. What these share is made-to-order work, where the product does not yet exist when the customer pays. A different approach for made-to-order services is described in online proposals for wedding banquet catering.
When It Does Not Fit
- Standard products. The model and appearance are fixed, and customers can decide from a catalog.
- Projects where the decision depends mainly on price or delivery time.
- Projects with few orders where each one needs an on-site measurement before it can be settled, since the cost of building and maintaining the preview is harder to recover.
What to Prepare Before Starting
- The decision customers most often get stuck on before paying
- The product items and style types to preview
- Existing logos (SVG preferred) and storefront photos
- The devices sales will use for proposals
Once these are ready, discuss the planning of the showroom and previews.